http://www.coolsiteoftheday.com/
This site posts a cool site--every day! It's great for finding a random site that you think you will enjoy or need. That's how I found StumbleUpon, which will be the subject of my next post.
The cool site is chosen by submissions. Basically, people submit their site or a site they enjoy, and hopefully it will be picked. What's more? No adult rated sites! So you can feel free to explore their submissions without worrying about what will pop up on the screen.
You can also get the cool site of the day right in your inbox every day so you don't have to go online to get it.
Give it a visit: you won't be dissapointed!
Note: I am hoping to get my blog listed as well. I could use the publicity :)

Friday, February 4, 2011
Thursday, February 3, 2011
ScribeFire: the ultimate blogger's tool
Scribefire: Fire up your blogging
It really couldn't get better.
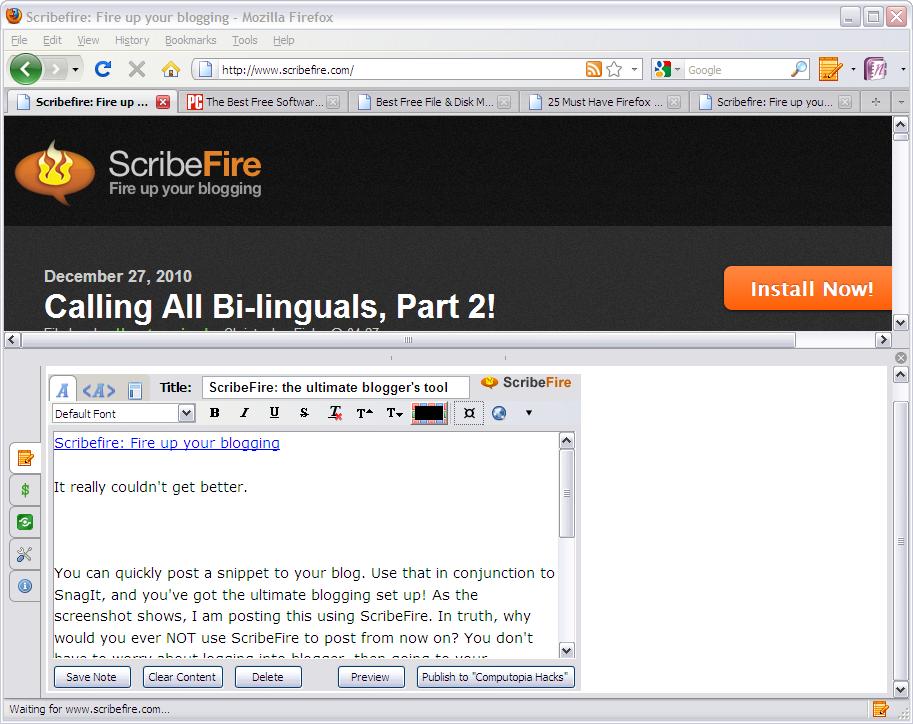
ScribeFire is a browser plugin which allows you to publish to your blog: from any page! Just press F8, and a pane (pictured above) pops up with all the options that a regular blog has. As the screenshot shows, I am posting this using ScribeFire.
Use that in conjunction to SnagIt, and you've got the ultimate blogging set up! In truth, why would you ever NOT use ScribeFire to post from now on? You don't have to worry about logging into blogger, then going to your dashboard, then going to your blog, then adding a post, and finally typing. With this tool, you press F8, and voila, you can start typing. As far as I know, it's for Chrome, Firefox, and Safari. I recommend Firefox, though. Why? Because Firefox is the overall best browser. It has possibly the most addons of all browsers, it's very fast compared to even Chrome or IE, and it's got a nice feel. So download Firefox if you don't already have it, then get ScribeFire from: https://addons.mozilla.org/en-US/firefox/addon/scribefire-blog-editor/
I truly recommend ScribeFire. It makes posting a much simpler process.
Happy blogging!
It really couldn't get better.
ScribeFire is a browser plugin which allows you to publish to your blog: from any page! Just press F8, and a pane (pictured above) pops up with all the options that a regular blog has. As the screenshot shows, I am posting this using ScribeFire.
Use that in conjunction to SnagIt, and you've got the ultimate blogging set up! In truth, why would you ever NOT use ScribeFire to post from now on? You don't have to worry about logging into blogger, then going to your dashboard, then going to your blog, then adding a post, and finally typing. With this tool, you press F8, and voila, you can start typing. As far as I know, it's for Chrome, Firefox, and Safari. I recommend Firefox, though. Why? Because Firefox is the overall best browser. It has possibly the most addons of all browsers, it's very fast compared to even Chrome or IE, and it's got a nice feel. So download Firefox if you don't already have it, then get ScribeFire from: https://addons.mozilla.org/en-US/firefox/addon/scribefire-blog-editor/
I truly recommend ScribeFire. It makes posting a much simpler process.
Happy blogging!
Saturday, December 11, 2010
Looking for a good Screen Capture program? Look no further than Tech Smith’s Snagit.
Snagit has amazing capture features, a pleasant GUI based on Microsoft’s ribbon, and useful/cool editing features. That’s right, with Snagit, you’re not bound to just taking an SS then publishing it online, ugly as it looks; you can edit using powerful features but a simple GUI so that you don’t have to tangle with the complications of a program like Photoshop.
Some features I found useful:
Window capture. Snaps to a window of your choice then takes a screenshot of it. If the window is behind something, it brings it to the front so it can captpure it. It’s truly an amazing feature, and saves having to crop the SS after you take it, or, if you use the snipping tool or any program that only has a region capture option, it allows you to save trying to select the region as perfectly as possible.
Scrolling window capture. This ultra-cool feature captures any window that scrolls so that you don’t have to take several screenshots. All you do is choose which window, then choose whether to scroll vertically or horizontally. (Only allows you to scroll horizontally if there’s a scroll bar to go that way). It automatically scrolls for you, capturing everything in that scroll region. Very useful, very awesome tool.
All in One. This combines different capture types into one capture so you can choose the best one while you’re capturing. It allows you to capture a region, a window, a scrolling window, a menu, or full screen. This capture automatically detects which you’re using and does it. If you go to the title bar of a window, it knows you want to capture the window. If you start dragging your cursor anywhere, it’s a region capture. If you hover over a menu, it’s a menu capture etc.
Multiple area capture. I believe I have not seen this anywhere besides Snagit. It allows you to capture, well, multiple areas. It’s very useful for, say, comparing two programs, or really anything that’ll have two or more elements and a region that you could cut out.

Once you’ve clicked the button that I highlighted in red (using paint, since I still haven’t installed Photoshop on this computer, sigh), you have set it to multiple area capture. (By the way, as you can see, the interface looks simple. But that’s just the Snagit capture. You still haven’t seen the editor. Plus, Snagit capture was designed to look simple. The middle with all the icons is just a few “presets”, or “profiles”. The bottom bar is where the real customizing power is. Also, see the drop down menu beside the big red button? That allows you to choose between video, text, screen, or web capture. Yes, that’s right. There’s 4 modes of capturing. Text capture is just way cool.) Here’s a screenshot of the actual capture.

As you can see, the Notepad window has inverted color. That’s because I have selected it. In the screenshot, I’m in the process of selecting the top of Notepad++. (Which by the way I recommend to you as well). Once I let go, it will invert the selection as well. If I accidentally select too much, no worries! Just hold alt while selecting to remove a selection. Then right-click and select Finish to take the screenshot. It’s an easy process compared to the alternative of cutting things out of a screen shot to mimic the effect.
Some neat things about the built-in Snagit screen shot editor:
Spotlight and Magnify. This amazing feature allows you to put a certain selection in the “spotlight”. Once you select something, you go to the image tab and click Spotlight and Magnify. You are provided with a few options, but the main idea is: dimming and blurring the background to make the selection bright and the first thing people look at, and magnifying it, or making it bigger. When magnified, it looks 3D, which is always a nice thing to have. Here’s an example of notepad vs. notepad++ just like the screenshot above, except using the spotlight and magnify effect.

As you can see, it’s definitely a cool, useful feature. If you use it without magnify and dim the background quite a bit, it’s useful for highlighting something that you want the viewer to look at.
3D effects. There are a few 3D effects you can utilize on your screen shots to make them a little more spicy. Here’s a screenshot like the one above, except using a 3D effect to show the comparison.

Hotspots. A newly added feature, this allows you to make simple flash images that react to mouse over movements. First, you go to the hotspot tab and use the selection tools to pick a spot for the action. Then, once it’s selected, you choose an action. For example, a text popup or display a small image. This is truly a neat feature for those making their own website or using a website that allows flash animations. (For those of you who don’t know what flash is: it’s basically a… (for lack of words) “thing” on the internet that contains animations that have programming in them. There’s a program called Flash to make these animations, and when they’re online, they show as very cool parts of your website. There are some websites that are all flash, too. These can provide quite the thrilling experience. Just Google “Top 10 flash websites” and visit each of these to see what I’m talking about. Trust me, you probably won’t regret it.) Once you’re finished adding hotspots to your screen shot, save it as a flash file so that these features are preserved.
But even with all these features that I’ve stated, I can’t even begin to show you all the neat things that Snagit can do. You need to see for yourself! Unfortunately, Snagit isn’t free, so you’ll have to use the trial version before deciding whether or not to buy it. Check it out at www.techsmith.com, then click on Snagit.
Just something to remember: Snagit isn’t only for screenshots. You can also use it for Web capture (Downloads all images from a website), Text capture (detects text with perfect accuracy in spots like message boxes, whose text can’t be selected or copied. That saves you time typing down error messages: you can just copy them), Video capture (Speaks for itself, it takes a video of whatever happens on the screen), and as I have shown you Screen capture. This adds a whole lot of functionality to this tool. I encourage you to try it, even if you don’t want to buy it. Maybe you’ll change your mind!
Monday, October 4, 2010
Windows XP: finding lost files (not deleted ones)
Today's tip will help you to enjoy the quick and easy way to find lost files on your computer. Try to search for a file with its file extension (for example for a word file, type *.doc (or *.docx for MS Word 2007), Excel *.xls, Acrobat *.pdf, *.ppt and *.exe for executable files. If you don't know the type of file but know that it contains a string of text then try to search for files containing specific text, type the text you want to find from any file or folder. This is time taking process but creates a very precise result. In Look in, click the drive, folder, or network you want to search. To save time, always select the specified drive or location instead of whole computer.


To specify additional search criteria, click Search Options, and then click one or more of the following options to narrow your search:
•Select Date to look for files that were created or modified on or between specific dates.
•Select Type to look for files of a specific type, such as a text or WordPad document.
•Select Size to look for files of a specific size.
•Select Advanced Options to specify additional search criteria.
Once you're done selecting all your search options, simply click Search.
Tip: You may want to download Windows Search to get more search capabilities -- plus faster searches! A couple features include Advanced Search Syntax and opening programs--right from your desktop.
If you choose to download Windows Search, (a wise decision indeed), you can go here to get some Advanced Search Syntax help.
Windows Search allows you to narrow your searches down incredibly so that you will find what you want. Also, you can write new commands to open certain programs. If you know how to write batch (.bat) programs, then you're all set with Windows Search.

Click the Start Button and click Search. A Search Results dialog box will appear. In Search for files or folders, type the file name or folder name you want to find in containing text.

To specify additional search criteria, click Search Options, and then click one or more of the following options to narrow your search:
•Select Date to look for files that were created or modified on or between specific dates.
•Select Type to look for files of a specific type, such as a text or WordPad document.
•Select Size to look for files of a specific size.
•Select Advanced Options to specify additional search criteria.
Once you're done selecting all your search options, simply click Search.
Tip: You may want to download Windows Search to get more search capabilities -- plus faster searches! A couple features include Advanced Search Syntax and opening programs--right from your desktop.
If you choose to download Windows Search, (a wise decision indeed), you can go here to get some Advanced Search Syntax help.
Windows Search allows you to narrow your searches down incredibly so that you will find what you want. Also, you can write new commands to open certain programs. If you know how to write batch (.bat) programs, then you're all set with Windows Search.
Monday, February 22, 2010
The forgotten feature: Active Desktop (XP)
That's right, good old Active Desktop is fairly forgotten. But, it's still a neat feature! All you need is a internet connection, and you're ready! Neat, huh? Well, here's how to do it!
Right-click the desktop, then select properties. In this dialog box that pops up, select the Desktop tab. Click on the Customize Desktop... button, which will pop up another dialog box. On the web tab, select New... then type in the URL of the site. I like Google for this. Once you click okay to all of the dialog boxes, you're done! A little box showing the website should appear. If you want it to be bigger, hover over the edge, then drag as you wish. If you want it to be full screen, no problem! Hover over the top, and a tiny bar will come up. Click on the first button there to make it full screen.
If you know JavaScript, you can make a webpage for yourself that has some neat stuff! For example, you can make a webpage with a roll-over image for the i-Candy. The possibilities are endless!
Home
Subscribe to:
Comments (Atom)