http://www.coolsiteoftheday.com/
This site posts a cool site--every day! It's great for finding a random site that you think you will enjoy or need. That's how I found StumbleUpon, which will be the subject of my next post.
The cool site is chosen by submissions. Basically, people submit their site or a site they enjoy, and hopefully it will be picked. What's more? No adult rated sites! So you can feel free to explore their submissions without worrying about what will pop up on the screen.
You can also get the cool site of the day right in your inbox every day so you don't have to go online to get it.
Give it a visit: you won't be dissapointed!
Note: I am hoping to get my blog listed as well. I could use the publicity :)

Friday, February 4, 2011


Thursday, February 3, 2011
ScribeFire: the ultimate blogger's tool
Scribefire: Fire up your blogging
It really couldn't get better.
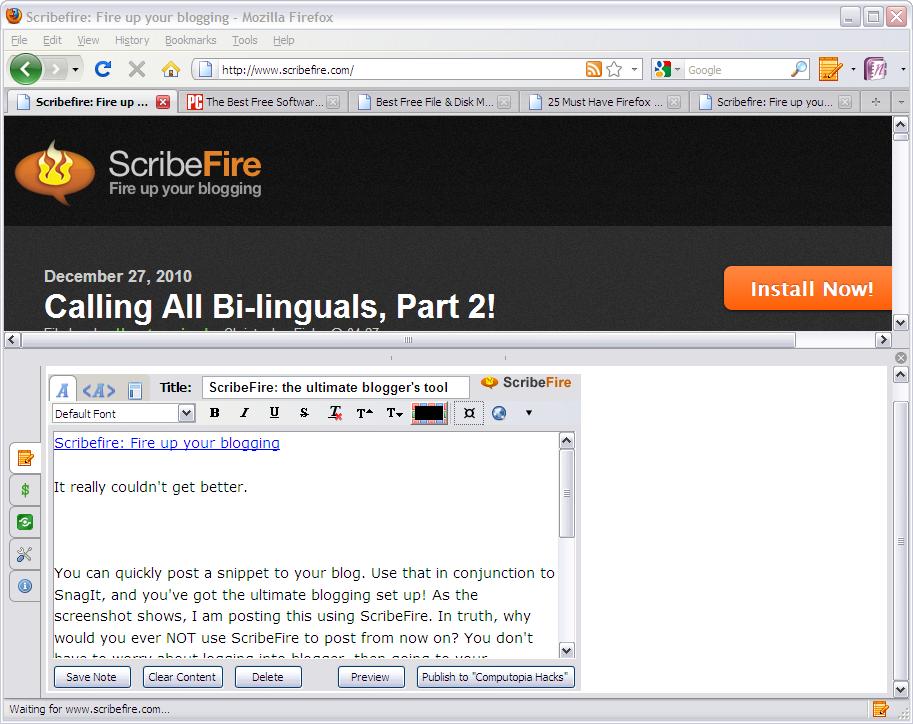
ScribeFire is a browser plugin which allows you to publish to your blog: from any page! Just press F8, and a pane (pictured above) pops up with all the options that a regular blog has. As the screenshot shows, I am posting this using ScribeFire.
Use that in conjunction to SnagIt, and you've got the ultimate blogging set up! In truth, why would you ever NOT use ScribeFire to post from now on? You don't have to worry about logging into blogger, then going to your dashboard, then going to your blog, then adding a post, and finally typing. With this tool, you press F8, and voila, you can start typing. As far as I know, it's for Chrome, Firefox, and Safari. I recommend Firefox, though. Why? Because Firefox is the overall best browser. It has possibly the most addons of all browsers, it's very fast compared to even Chrome or IE, and it's got a nice feel. So download Firefox if you don't already have it, then get ScribeFire from: https://addons.mozilla.org/en-US/firefox/addon/scribefire-blog-editor/
I truly recommend ScribeFire. It makes posting a much simpler process.
Happy blogging!
It really couldn't get better.
ScribeFire is a browser plugin which allows you to publish to your blog: from any page! Just press F8, and a pane (pictured above) pops up with all the options that a regular blog has. As the screenshot shows, I am posting this using ScribeFire.
Use that in conjunction to SnagIt, and you've got the ultimate blogging set up! In truth, why would you ever NOT use ScribeFire to post from now on? You don't have to worry about logging into blogger, then going to your dashboard, then going to your blog, then adding a post, and finally typing. With this tool, you press F8, and voila, you can start typing. As far as I know, it's for Chrome, Firefox, and Safari. I recommend Firefox, though. Why? Because Firefox is the overall best browser. It has possibly the most addons of all browsers, it's very fast compared to even Chrome or IE, and it's got a nice feel. So download Firefox if you don't already have it, then get ScribeFire from: https://addons.mozilla.org/en-US/firefox/addon/scribefire-blog-editor/
I truly recommend ScribeFire. It makes posting a much simpler process.
Happy blogging!
Saturday, December 11, 2010
Looking for a good Screen Capture program? Look no further than Tech Smith’s Snagit.
Snagit has amazing capture features, a pleasant GUI based on Microsoft’s ribbon, and useful/cool editing features. That’s right, with Snagit, you’re not bound to just taking an SS then publishing it online, ugly as it looks; you can edit using powerful features but a simple GUI so that you don’t have to tangle with the complications of a program like Photoshop.
Some features I found useful:
Window capture. Snaps to a window of your choice then takes a screenshot of it. If the window is behind something, it brings it to the front so it can captpure it. It’s truly an amazing feature, and saves having to crop the SS after you take it, or, if you use the snipping tool or any program that only has a region capture option, it allows you to save trying to select the region as perfectly as possible.
Scrolling window capture. This ultra-cool feature captures any window that scrolls so that you don’t have to take several screenshots. All you do is choose which window, then choose whether to scroll vertically or horizontally. (Only allows you to scroll horizontally if there’s a scroll bar to go that way). It automatically scrolls for you, capturing everything in that scroll region. Very useful, very awesome tool.
All in One. This combines different capture types into one capture so you can choose the best one while you’re capturing. It allows you to capture a region, a window, a scrolling window, a menu, or full screen. This capture automatically detects which you’re using and does it. If you go to the title bar of a window, it knows you want to capture the window. If you start dragging your cursor anywhere, it’s a region capture. If you hover over a menu, it’s a menu capture etc.
Multiple area capture. I believe I have not seen this anywhere besides Snagit. It allows you to capture, well, multiple areas. It’s very useful for, say, comparing two programs, or really anything that’ll have two or more elements and a region that you could cut out.
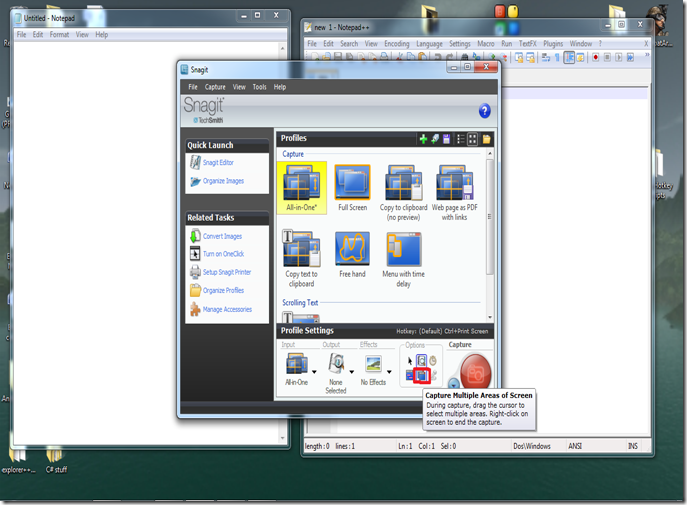
Once you’ve clicked the button that I highlighted in red (using paint, since I still haven’t installed Photoshop on this computer, sigh), you have set it to multiple area capture. (By the way, as you can see, the interface looks simple. But that’s just the Snagit capture. You still haven’t seen the editor. Plus, Snagit capture was designed to look simple. The middle with all the icons is just a few “presets”, or “profiles”. The bottom bar is where the real customizing power is. Also, see the drop down menu beside the big red button? That allows you to choose between video, text, screen, or web capture. Yes, that’s right. There’s 4 modes of capturing. Text capture is just way cool.) Here’s a screenshot of the actual capture.
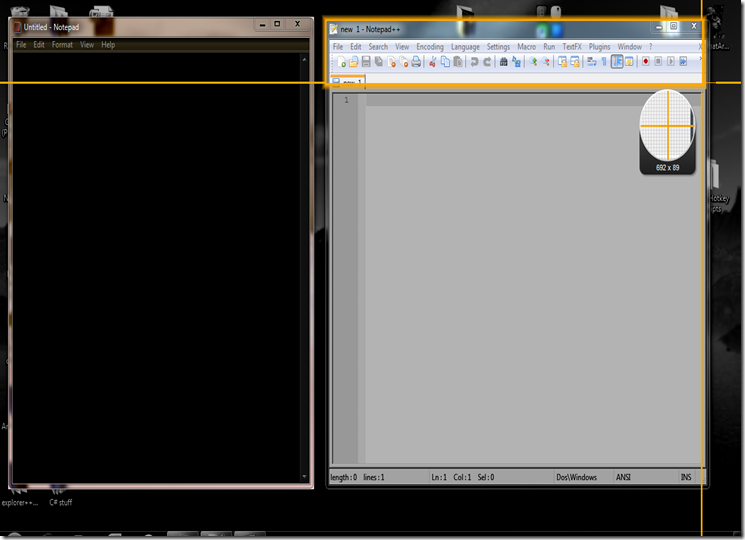
As you can see, the Notepad window has inverted color. That’s because I have selected it. In the screenshot, I’m in the process of selecting the top of Notepad++. (Which by the way I recommend to you as well). Once I let go, it will invert the selection as well. If I accidentally select too much, no worries! Just hold alt while selecting to remove a selection. Then right-click and select Finish to take the screenshot. It’s an easy process compared to the alternative of cutting things out of a screen shot to mimic the effect.
Some neat things about the built-in Snagit screen shot editor:
Spotlight and Magnify. This amazing feature allows you to put a certain selection in the “spotlight”. Once you select something, you go to the image tab and click Spotlight and Magnify. You are provided with a few options, but the main idea is: dimming and blurring the background to make the selection bright and the first thing people look at, and magnifying it, or making it bigger. When magnified, it looks 3D, which is always a nice thing to have. Here’s an example of notepad vs. notepad++ just like the screenshot above, except using the spotlight and magnify effect.

As you can see, it’s definitely a cool, useful feature. If you use it without magnify and dim the background quite a bit, it’s useful for highlighting something that you want the viewer to look at.
3D effects. There are a few 3D effects you can utilize on your screen shots to make them a little more spicy. Here’s a screenshot like the one above, except using a 3D effect to show the comparison.

Hotspots. A newly added feature, this allows you to make simple flash images that react to mouse over movements. First, you go to the hotspot tab and use the selection tools to pick a spot for the action. Then, once it’s selected, you choose an action. For example, a text popup or display a small image. This is truly a neat feature for those making their own website or using a website that allows flash animations. (For those of you who don’t know what flash is: it’s basically a… (for lack of words) “thing” on the internet that contains animations that have programming in them. There’s a program called Flash to make these animations, and when they’re online, they show as very cool parts of your website. There are some websites that are all flash, too. These can provide quite the thrilling experience. Just Google “Top 10 flash websites” and visit each of these to see what I’m talking about. Trust me, you probably won’t regret it.) Once you’re finished adding hotspots to your screen shot, save it as a flash file so that these features are preserved.
But even with all these features that I’ve stated, I can’t even begin to show you all the neat things that Snagit can do. You need to see for yourself! Unfortunately, Snagit isn’t free, so you’ll have to use the trial version before deciding whether or not to buy it. Check it out at www.techsmith.com, then click on Snagit.
Just something to remember: Snagit isn’t only for screenshots. You can also use it for Web capture (Downloads all images from a website), Text capture (detects text with perfect accuracy in spots like message boxes, whose text can’t be selected or copied. That saves you time typing down error messages: you can just copy them), Video capture (Speaks for itself, it takes a video of whatever happens on the screen), and as I have shown you Screen capture. This adds a whole lot of functionality to this tool. I encourage you to try it, even if you don’t want to buy it. Maybe you’ll change your mind!
Some features I found useful:
Window capture. Snaps to a window of your choice then takes a screenshot of it. If the window is behind something, it brings it to the front so it can captpure it. It’s truly an amazing feature, and saves having to crop the SS after you take it, or, if you use the snipping tool or any program that only has a region capture option, it allows you to save trying to select the region as perfectly as possible.
Scrolling window capture. This ultra-cool feature captures any window that scrolls so that you don’t have to take several screenshots. All you do is choose which window, then choose whether to scroll vertically or horizontally. (Only allows you to scroll horizontally if there’s a scroll bar to go that way). It automatically scrolls for you, capturing everything in that scroll region. Very useful, very awesome tool.
All in One. This combines different capture types into one capture so you can choose the best one while you’re capturing. It allows you to capture a region, a window, a scrolling window, a menu, or full screen. This capture automatically detects which you’re using and does it. If you go to the title bar of a window, it knows you want to capture the window. If you start dragging your cursor anywhere, it’s a region capture. If you hover over a menu, it’s a menu capture etc.
Multiple area capture. I believe I have not seen this anywhere besides Snagit. It allows you to capture, well, multiple areas. It’s very useful for, say, comparing two programs, or really anything that’ll have two or more elements and a region that you could cut out.

Once you’ve clicked the button that I highlighted in red (using paint, since I still haven’t installed Photoshop on this computer, sigh), you have set it to multiple area capture. (By the way, as you can see, the interface looks simple. But that’s just the Snagit capture. You still haven’t seen the editor. Plus, Snagit capture was designed to look simple. The middle with all the icons is just a few “presets”, or “profiles”. The bottom bar is where the real customizing power is. Also, see the drop down menu beside the big red button? That allows you to choose between video, text, screen, or web capture. Yes, that’s right. There’s 4 modes of capturing. Text capture is just way cool.) Here’s a screenshot of the actual capture.

As you can see, the Notepad window has inverted color. That’s because I have selected it. In the screenshot, I’m in the process of selecting the top of Notepad++. (Which by the way I recommend to you as well). Once I let go, it will invert the selection as well. If I accidentally select too much, no worries! Just hold alt while selecting to remove a selection. Then right-click and select Finish to take the screenshot. It’s an easy process compared to the alternative of cutting things out of a screen shot to mimic the effect.
Some neat things about the built-in Snagit screen shot editor:
Spotlight and Magnify. This amazing feature allows you to put a certain selection in the “spotlight”. Once you select something, you go to the image tab and click Spotlight and Magnify. You are provided with a few options, but the main idea is: dimming and blurring the background to make the selection bright and the first thing people look at, and magnifying it, or making it bigger. When magnified, it looks 3D, which is always a nice thing to have. Here’s an example of notepad vs. notepad++ just like the screenshot above, except using the spotlight and magnify effect.

As you can see, it’s definitely a cool, useful feature. If you use it without magnify and dim the background quite a bit, it’s useful for highlighting something that you want the viewer to look at.
3D effects. There are a few 3D effects you can utilize on your screen shots to make them a little more spicy. Here’s a screenshot like the one above, except using a 3D effect to show the comparison.

Hotspots. A newly added feature, this allows you to make simple flash images that react to mouse over movements. First, you go to the hotspot tab and use the selection tools to pick a spot for the action. Then, once it’s selected, you choose an action. For example, a text popup or display a small image. This is truly a neat feature for those making their own website or using a website that allows flash animations. (For those of you who don’t know what flash is: it’s basically a… (for lack of words) “thing” on the internet that contains animations that have programming in them. There’s a program called Flash to make these animations, and when they’re online, they show as very cool parts of your website. There are some websites that are all flash, too. These can provide quite the thrilling experience. Just Google “Top 10 flash websites” and visit each of these to see what I’m talking about. Trust me, you probably won’t regret it.) Once you’re finished adding hotspots to your screen shot, save it as a flash file so that these features are preserved.
But even with all these features that I’ve stated, I can’t even begin to show you all the neat things that Snagit can do. You need to see for yourself! Unfortunately, Snagit isn’t free, so you’ll have to use the trial version before deciding whether or not to buy it. Check it out at www.techsmith.com, then click on Snagit.
Just something to remember: Snagit isn’t only for screenshots. You can also use it for Web capture (Downloads all images from a website), Text capture (detects text with perfect accuracy in spots like message boxes, whose text can’t be selected or copied. That saves you time typing down error messages: you can just copy them), Video capture (Speaks for itself, it takes a video of whatever happens on the screen), and as I have shown you Screen capture. This adds a whole lot of functionality to this tool. I encourage you to try it, even if you don’t want to buy it. Maybe you’ll change your mind!
Monday, October 4, 2010
Windows XP: finding lost files (not deleted ones)
Today's tip will help you to enjoy the quick and easy way to find lost files on your computer. Try to search for a file with its file extension (for example for a word file, type *.doc (or *.docx for MS Word 2007), Excel *.xls, Acrobat *.pdf, *.ppt and *.exe for executable files. If you don't know the type of file but know that it contains a string of text then try to search for files containing specific text, type the text you want to find from any file or folder. This is time taking process but creates a very precise result. In Look in, click the drive, folder, or network you want to search. To save time, always select the specified drive or location instead of whole computer.


To specify additional search criteria, click Search Options, and then click one or more of the following options to narrow your search:
•Select Date to look for files that were created or modified on or between specific dates.
•Select Type to look for files of a specific type, such as a text or WordPad document.
•Select Size to look for files of a specific size.
•Select Advanced Options to specify additional search criteria.
Once you're done selecting all your search options, simply click Search.
Tip: You may want to download Windows Search to get more search capabilities -- plus faster searches! A couple features include Advanced Search Syntax and opening programs--right from your desktop.
If you choose to download Windows Search, (a wise decision indeed), you can go here to get some Advanced Search Syntax help.
Windows Search allows you to narrow your searches down incredibly so that you will find what you want. Also, you can write new commands to open certain programs. If you know how to write batch (.bat) programs, then you're all set with Windows Search.

Click the Start Button and click Search. A Search Results dialog box will appear. In Search for files or folders, type the file name or folder name you want to find in containing text.

To specify additional search criteria, click Search Options, and then click one or more of the following options to narrow your search:
•Select Date to look for files that were created or modified on or between specific dates.
•Select Type to look for files of a specific type, such as a text or WordPad document.
•Select Size to look for files of a specific size.
•Select Advanced Options to specify additional search criteria.
Once you're done selecting all your search options, simply click Search.
Tip: You may want to download Windows Search to get more search capabilities -- plus faster searches! A couple features include Advanced Search Syntax and opening programs--right from your desktop.
If you choose to download Windows Search, (a wise decision indeed), you can go here to get some Advanced Search Syntax help.
Windows Search allows you to narrow your searches down incredibly so that you will find what you want. Also, you can write new commands to open certain programs. If you know how to write batch (.bat) programs, then you're all set with Windows Search.
Monday, February 22, 2010
The forgotten feature: Active Desktop (XP)
That's right, good old Active Desktop is fairly forgotten. But, it's still a neat feature! All you need is a internet connection, and you're ready! Neat, huh? Well, here's how to do it!
Right-click the desktop, then select properties. In this dialog box that pops up, select the Desktop tab. Click on the Customize Desktop... button, which will pop up another dialog box. On the web tab, select New... then type in the URL of the site. I like Google for this. Once you click okay to all of the dialog boxes, you're done! A little box showing the website should appear. If you want it to be bigger, hover over the edge, then drag as you wish. If you want it to be full screen, no problem! Hover over the top, and a tiny bar will come up. Click on the first button there to make it full screen.
If you know JavaScript, you can make a webpage for yourself that has some neat stuff! For example, you can make a webpage with a roll-over image for the i-Candy. The possibilities are endless!
Home
Right-click the desktop, then select properties. In this dialog box that pops up, select the Desktop tab. Click on the Customize Desktop... button, which will pop up another dialog box. On the web tab, select New... then type in the URL of the site. I like Google for this. Once you click okay to all of the dialog boxes, you're done! A little box showing the website should appear. If you want it to be bigger, hover over the edge, then drag as you wish. If you want it to be full screen, no problem! Hover over the top, and a tiny bar will come up. Click on the first button there to make it full screen.
If you know JavaScript, you can make a webpage for yourself that has some neat stuff! For example, you can make a webpage with a roll-over image for the i-Candy. The possibilities are endless!
Home
Saturday, February 6, 2010
Speed up your computer's shutdown time 2
This hack will effectively speed up your shut down time. Have you ever clicked the Restart button, then, after 30 minutes or so, come back to see a dialog box saying "Do you want to End this program?" Or something like that, giving you the End Now or cancel box? How rude! It doesn't even turn off my computer when it is told to! Then, you have to click End Now to a series of dialog boxes before it actually turns off. This hack will automatically end these programs for you, so you don't have to waste time clicking a bunch of buttons:
1. Click Start > Run, type regedit, followed by enter.
2. Navigate to HKEY_CURRENT_USER\Control Panel\Desktop.
3. Double-click the value AutoEndTasks and then change the value to 1.
4. Close regedit.
Home
Speed up your computer's shutdown time
This hack will effectively speed up your shut down time.
1. Click Start > Run, then type regedit, followed by enter.
This is the registry. Don't touch it beyond what I tell you to, or else you might do something really harmful to your computer.
2. Navigate to HKEY_CURRENT_USER\Control Panel\Desktop. Select WaitToKillAppTimeout and set the value to 1000. (1 second)
3. Select the HungAppTimeout value and set it to 1000 as well.
4. Navigate to HKEY_USERS\.DEFAULT\Control Panel\Desktop. Set the WaitToKillAppTimeout and HungAppTimeout values to 1000.
5. And, finally, Navigate to HKEY_LOCAL_MACHINE\System\CurrentControlSet\Control select the WaitToKillServiceTimeout value and set that to 1000 as well.
Home
1. Click Start > Run, then type regedit, followed by enter.
This is the registry. Don't touch it beyond what I tell you to, or else you might do something really harmful to your computer.
2. Navigate to HKEY_CURRENT_USER\Control Panel\Desktop. Select WaitToKillAppTimeout and set the value to 1000. (1 second)
3. Select the HungAppTimeout value and set it to 1000 as well.
4. Navigate to HKEY_USERS\.DEFAULT\Control Panel\Desktop. Set the WaitToKillAppTimeout and HungAppTimeout values to 1000.
5. And, finally, Navigate to HKEY_LOCAL_MACHINE\System\CurrentControlSet\Control select the WaitToKillServiceTimeout value and set that to 1000 as well.
Home
How to login automatically to windows
This is a real time-saver if you have an account that you rarely use, and want to speed up your boot time. Have you ever had the annoyance of turning on your computer, then forgetting about it, then coming back to see that you still have to login and wait for it to load the computer? Been there, done that. This will save you time:
1. Log on with an administrator account, then Click Start > Run, type control userpasswords2 and click ok or press enter.
2. Clear the "Users must enter a user name and password to use this computer" check box, and then click Apply.
3. In the Automatically Log On window, type the account that you want to automatically log onto's password, confirm it, then press enter.
CAUTION: If you don't want people in your account, this is not for you. This will automatically log on, so if you have a password for your account, it will bypass the password. (In other words, you don't have to put the password for it to log on).
1. Log on with an administrator account, then Click Start > Run, type control userpasswords2 and click ok or press enter.
2. Clear the "Users must enter a user name and password to use this computer" check box, and then click Apply.
3. In the Automatically Log On window, type the account that you want to automatically log onto's password, confirm it, then press enter.
CAUTION: If you don't want people in your account, this is not for you. This will automatically log on, so if you have a password for your account, it will bypass the password. (In other words, you don't have to put the password for it to log on).
Hack your XP desktop: get back the beloved icons!
If you've come from Windows 2000 to Windows XP, you'll probably notice that the icons that used to be on the desktop are no longer there! Well, here's a quick hack to get them back.
1. Right-click the desktop
2. Select Properties
3. Go to the Desktop tab
4. Select Customize Desktop...
5. Check the boxes next to the icons you want back on your desktop, and you're done!
Home
1. Right-click the desktop
2. Select Properties
3. Go to the Desktop tab
4. Select Customize Desktop...
5. Check the boxes next to the icons you want back on your desktop, and you're done!
Home
Quick Speed Hack
If you have a slow computer and are looking for speed, this hack will definitely speed up your computer. In this post I will talk about two things you can do:
First Thing
The first thing to do is go back to the windows 2000 look. If you're protesting, like I first did, just try it out! I now like the windows 2000 look even more than XP. (I really don't know why) To switch back to the windows 2000 look, (which I did, and trust me, it really does speed up your computer),
For XP: {
1. Right-click the desktop and select Properties.
}
For Vista and Windows 7: {
2. (Alternative to step 1) Right-click the desktop, select personalize.
}
For XP: {
3. By default, you're on the themes tab, which is what we want. In the drop down menu, select Windows Classic, and then apply. Your screen will darken for a little bit, and then your new theme will be set in place.
}
For Vista and Windows 7: {
4. (Alternative to 3) Scroll down until you see several previews of possible themes. Click on the second one, "Windows Classic", to set it back to the Windows 2000 look.
Congratulations, you're now back to Y2K. Don't get all discouraged by the "horrible looking theme", it's really not that bad when you get used to it. As I said, I like it more than the XP, Vista and Windows 7 themes now. This hack will work even better with Vista and Windows 7, especially Vista.
Second Thing
The second one also cuts down on eye candy, but not as much. (Sorry, I only know the XP way of doing this.)
1. Click Start, then Right-click my computer and select properties.
2. Select the Advanced tab, then, in the Performance section, select settings.

3. Now, uncheck everything inside the box, and click ok until you close both windows.
TIP: You'll notice that the text might be hard to read. If you don't mind, then you're good, but if you can't stand it, (which I can't), recheck the box that says Smooth edges of Screen Fonts.
Home
First Thing
The first thing to do is go back to the windows 2000 look. If you're protesting, like I first did, just try it out! I now like the windows 2000 look even more than XP. (I really don't know why) To switch back to the windows 2000 look, (which I did, and trust me, it really does speed up your computer),
For XP: {
1. Right-click the desktop and select Properties.
}
For Vista and Windows 7: {
2. (Alternative to step 1) Right-click the desktop, select personalize.
}
For XP: {
3. By default, you're on the themes tab, which is what we want. In the drop down menu, select Windows Classic, and then apply. Your screen will darken for a little bit, and then your new theme will be set in place.
}
For Vista and Windows 7: {
4. (Alternative to 3) Scroll down until you see several previews of possible themes. Click on the second one, "Windows Classic", to set it back to the Windows 2000 look.
Congratulations, you're now back to Y2K. Don't get all discouraged by the "horrible looking theme", it's really not that bad when you get used to it. As I said, I like it more than the XP, Vista and Windows 7 themes now. This hack will work even better with Vista and Windows 7, especially Vista.
Second Thing
The second one also cuts down on eye candy, but not as much. (Sorry, I only know the XP way of doing this.)
1. Click Start, then Right-click my computer and select properties.
2. Select the Advanced tab, then, in the Performance section, select settings.

3. Now, uncheck everything inside the box, and click ok until you close both windows.
TIP: You'll notice that the text might be hard to read. If you don't mind, then you're good, but if you can't stand it, (which I can't), recheck the box that says Smooth edges of Screen Fonts.
Home
Saturday, January 23, 2010
Hack your Start Menu: Customize the programs and folders
It's really quite simple. I mean, how simple can it get? I will show you more than two ways to mess around with your start menu, and it will most likely improve your production speed.
The first way is just to drag and drop into the start menu. For example, if you want to add a folder that you use often into the start menu, just drag it over the start icon until it opens, hover over All Programs, and place it in an empty slot. You can also right-click one of the folders and select Sort By Name to sort all the files by name. This saves me a lot of time because it's easier to look in alphabetic order than to look in "Most Recent" order. Warning: I don't think there's a way to reverse this action. If you don't like this setting, then don't try it.
Another way to add folders is to right-click the Start Menu and select Explore. Then, open the Programs folder. In this folder, add whatever folders or files you want, and they should appear in the Start Menu.
If you don't want a certain program on your start menu, just right-click it and select Remove From This List.
NOTE: It will come back once you use it enough. Scroll down for a way to make it stay off the Start Menu permanently.
To keep a application off the frequently run programs list is a little harder, but worth it. First, open the Run dialog box by either Pressing Windows Key + R or clicking the Start Menu and then the Run option. Type regedit and press enter.
WARNING: The Registry, (regedit), is a very dangerous place. Be careful, and do only what I tell you to do. If you mess up your computer, it's not my fault, it's just because you got side-tracked. And trust me, it's easy to get side-tracked.
That said, let's get to business. To demonstrate, I will use Solitaire as an example. Open My Computer, then HKEY_CLASSES_ROOT\Applications. (You'll have to do some serious scrolling to get to Applications). Once in here, select the name of the application you want. The thing is, these are the root EXE file names, so if you don't know the root EXE or process name of the application you want off the start menu frequently run list, you will need some investigation skills. (By the way, Solitaire's process is sol.exe. Let's just pretend we don't know that.) Just open Task Manager with Ctrl + Shift + Escape, trust me, it works, then run the application, Solitaire in this case, and see it's listing in the Applications tab of Task Manager. To find out it's process, just right-click it in Task Manager and select "Go To Process". The process name will be highlighted. That, (sol.exe), is what you need to keep it off the Start Menu. Go back to the registry and find sol.exe in the list. If it's not there, which I doubt it is, right-click on the Applications folder icon and select New > Key. Call it the process name, (sol.exe for the example), and wala, it's there. Now, select the process name and go to the right pane. Right-click here and select New > String value. Call it NoStartPage. You will never see Solitaire, or the application you're trying to keep away on the Start Menu Frequently Run Programs list anymore. (You need to log off your computer for it to work.) To undo this, just delete NoStartPage. Yay! I suggest you try it with Solitaire to get the hang of it, and then try it with any other application. Comment if you're having trouble.
You can also add an application to the list by right-clicking it and selecting Pin To Start Menu.
This concludes this Start Menu bonanza.
The first way is just to drag and drop into the start menu. For example, if you want to add a folder that you use often into the start menu, just drag it over the start icon until it opens, hover over All Programs, and place it in an empty slot. You can also right-click one of the folders and select Sort By Name to sort all the files by name. This saves me a lot of time because it's easier to look in alphabetic order than to look in "Most Recent" order. Warning: I don't think there's a way to reverse this action. If you don't like this setting, then don't try it.
Another way to add folders is to right-click the Start Menu and select Explore. Then, open the Programs folder. In this folder, add whatever folders or files you want, and they should appear in the Start Menu.
If you don't want a certain program on your start menu, just right-click it and select Remove From This List.
NOTE: It will come back once you use it enough. Scroll down for a way to make it stay off the Start Menu permanently.
To keep a application off the frequently run programs list is a little harder, but worth it. First, open the Run dialog box by either Pressing Windows Key + R or clicking the Start Menu and then the Run option. Type regedit and press enter.
WARNING: The Registry, (regedit), is a very dangerous place. Be careful, and do only what I tell you to do. If you mess up your computer, it's not my fault, it's just because you got side-tracked. And trust me, it's easy to get side-tracked.
That said, let's get to business. To demonstrate, I will use Solitaire as an example. Open My Computer, then HKEY_CLASSES_ROOT\Applications. (You'll have to do some serious scrolling to get to Applications). Once in here, select the name of the application you want. The thing is, these are the root EXE file names, so if you don't know the root EXE or process name of the application you want off the start menu frequently run list, you will need some investigation skills. (By the way, Solitaire's process is sol.exe. Let's just pretend we don't know that.) Just open Task Manager with Ctrl + Shift + Escape, trust me, it works, then run the application, Solitaire in this case, and see it's listing in the Applications tab of Task Manager. To find out it's process, just right-click it in Task Manager and select "Go To Process". The process name will be highlighted. That, (sol.exe), is what you need to keep it off the Start Menu. Go back to the registry and find sol.exe in the list. If it's not there, which I doubt it is, right-click on the Applications folder icon and select New > Key. Call it the process name, (sol.exe for the example), and wala, it's there. Now, select the process name and go to the right pane. Right-click here and select New > String value. Call it NoStartPage. You will never see Solitaire, or the application you're trying to keep away on the Start Menu Frequently Run Programs list anymore. (You need to log off your computer for it to work.) To undo this, just delete NoStartPage. Yay! I suggest you try it with Solitaire to get the hang of it, and then try it with any other application. Comment if you're having trouble.
You can also add an application to the list by right-clicking it and selecting Pin To Start Menu.
This concludes this Start Menu bonanza.
Thursday, January 21, 2010
Hack your Taskbar: Customize and add Toolbars
Have you ever wanted to customize your taskbar to it's full extent? Easy. In fact, I don't even think you realize how much it can be changed! To get started, I'll show you how to add a folder tool bar!
First, unlock your task bar by right-clicking it and selecting Lock the Taskbar. (If it's checked.) Now, right-click it again and select Toolbars > New Toolbar...
Now, browse for a folder that you want, for example, a removable drive would be really good and convenient. Now, your folder will appear on the task bar. Most likely, though, you don't want it there. No problem. Just drag it out onto the desktop, or, if you don't want it there, drag it to the edge of the screen somewhere to attach it to the edge.
Have you ever used the Quick Launch toolbar? I use it all the time to launch my favorite applications. You can move that around, too.
Also, at the bottom right corner is the beloved "thing that has all those icons." If you want to keep some icons behind the little arrow, just right-click the taskbar, select properties, then click Customize... Change the ones you want to always hide or always show. The ones that are always hidden will always stay behind the arrow. This saves a bit of space!
First, unlock your task bar by right-clicking it and selecting Lock the Taskbar. (If it's checked.) Now, right-click it again and select Toolbars > New Toolbar...
Now, browse for a folder that you want, for example, a removable drive would be really good and convenient. Now, your folder will appear on the task bar. Most likely, though, you don't want it there. No problem. Just drag it out onto the desktop, or, if you don't want it there, drag it to the edge of the screen somewhere to attach it to the edge.
Have you ever used the Quick Launch toolbar? I use it all the time to launch my favorite applications. You can move that around, too.
Also, at the bottom right corner is the beloved "thing that has all those icons." If you want to keep some icons behind the little arrow, just right-click the taskbar, select properties, then click Customize... Change the ones you want to always hide or always show. The ones that are always hidden will always stay behind the arrow. This saves a bit of space!
Monday, January 18, 2010
Hack your Context Menus: Modify the Send To Menu
This is really fast, and useful. Have you ever wanted to Send a shortcut to a file somewhere in your computer but it's not in the send to list? (When you right-click the file and go to send to.) Well, now you can add whatever you want to it. It's easy. Skip to Step 1 if you're using XP, Skip to Step 2 if you're using Vista or Windows 7.
Step 1. XP
Navigate to C:\Documents and Settings\YOUR-USER-NAME. Then, if hidden files are not shown, you need to show them by clicking Tools > Folder Options, then clicking the view tab and clicking Show Hidden files and folders. Now, in the folder you're in, there should be a half transparent file called SendTo. All you have to do is open this:
If you want to add My Videos, for example, create a SHORTCUT, not a copy, a shortcut to it, and put it in this folder. Then, when you right-click something, it will allow you to send it here!
Thursday, January 14, 2010
Hack your TaskBar: ALWAYS Group similar items
Have you ever noticed that when you have a lot of windows open, Windows starts grouping similar windows? Well, if you like that, you can make it happen more often! Heres how:
Open the registry by clicking start > Run, and typing regedit, follow by enter.
Then navigate to: HKEY_CURRRENT_USER \ Software \ Microsoft \ Windows \ CurrentVersion \ Explorer \ Advanced.
Then you’ll need to create a new DWORD (32-bit) value called TaskbarGroupSize there. A value of "0" will disable the feature, while a larger numerical setting (2 or higher) will initiate the grouping when that number of similar windows is open. You can also use this if you want it to stop grouping them, just put a higher number, like 10 or 20.
Open the registry by clicking start > Run, and typing regedit, follow by enter.
Then navigate to: HKEY_CURRRENT_USER \ Software \ Microsoft \ Windows \ CurrentVersion \ Explorer \ Advanced.
Then you’ll need to create a new DWORD (32-bit) value called TaskbarGroupSize there. A value of "0" will disable the feature, while a larger numerical setting (2 or higher) will initiate the grouping when that number of similar windows is open. You can also use this if you want it to stop grouping them, just put a higher number, like 10 or 20.
Hack your desktop: Hide Recycle Bin
Well, there are a few ways to hide the Recycle bin, but the safest can only be used in Windows XP Professional. If you don't know whether you have it or not, go to the start menu, then right-click My Computer and click properties. A multi-tabbed dialog box will show up. Stay on the current tab, and look for something that says
System:
Microsoft Windows XP
Something Something Something
In place of Something Something Something should either say Home Edition or Professional edition. If it says Professional Edition, go to Step 1. If it says Home Edition, skip step one and go to step 2. (If you have Professional Edition, don't use step 2.
Step 1. Professional Edition
This is easy. Click Start > Run, or press Windows Key + R, and type gpedit.msc, and hit enter.
System:
Microsoft Windows XP
Something Something Something
In place of Something Something Something should either say Home Edition or Professional edition. If it says Professional Edition, go to Step 1. If it says Home Edition, skip step one and go to step 2. (If you have Professional Edition, don't use step 2.
Step 1. Professional Edition
This is easy. Click Start > Run, or press Windows Key + R, and type gpedit.msc, and hit enter.
- On the Left Column Expand Administrative Templates, click on Desktop
- On the Right Column Find Remove Recycle Bin Icon from Desktop
- Double click on it, A Property Window will Appear
- Select Enable option, Press OK.
To make it work, right-click the desktop and select refresh. Your Recycle Bin should disappear. If you have trouble, just post a comment. For another tip, go to Step 3.
Step 2. Home Edition
For Home Edition, it's not that easy. You need to get your hands dirty and jump into the registry.
NOTE: The registry is a dangerous place. If you do one thing wrong, you could end up with a not-so-happy computer. I am not liable if you destroy it, I gave the right steps, so it's not my fault. It's a good idea to back up the registry before starting. To back it up:
Scroll to the top and click "My Computer". Then, click File > Export, and put it somewhere in your computer. This may take a while, though.
Now to get down to business. To hide the Recycle bin, expand My Computer, then each of these keys:
HKEY_CURRENT_USER\Software\Microsoft\Windows\CurrentVersion\Explorer\HideDesktopIcons\NewStartPanel.
right click on {645FF040-5081-101B-9F08-00AA002F954E}, then set it to 1 to hide the recycle bin. Then Refresh the desktop by right-clicking on it, then selecting Refresh.
Step 3. Making it easier for yourself.
Open notepad and paste, DONT TYPE, the following code into it.
Windows Registry Editor Version 5.00
[HKEY_LOCAL_MACHINE\SOFTWARE\Microsoft\Windows\CurrentVersion\Explorer\
Advanced\Folder\RecycleBinOnDesktop]
"RegPath"="Software\\Microsoft\\Windows\\CurrentVersion\\Explorer\\
HideDesktopIcons\\NewStartPanel"
"Text"="Show Recycle-Bin Icon on the Desktop"
"Type"="checkbox"
"ValueName"="{645FF040-5081-101B-9F08-00AA002F954E}"
"CheckedValue"=dword:00000000
"UncheckedValue"=dword:00000001
"DefaultValue"=dword:00000000
"HKeyRoot"=dword:80000001
[HKEY_LOCAL_MACHINE\SOFTWARE\Microsoft\Windows\CurrentVersion\Explorer\
Advanced\Folder\RecycleBinOnDesktop]
"RegPath"="Software\\Microsoft\\Windows\\CurrentVersion\\Explorer\\
HideDesktopIcons\\NewStartPanel"
"Text"="Show Recycle-Bin Icon on the Desktop"
"Type"="checkbox"
"ValueName"="{645FF040-5081-101B-9F08-00AA002F954E}"
"CheckedValue"=dword:00000000
"UncheckedValue"=dword:00000001
"DefaultValue"=dword:00000000
"HKeyRoot"=dword:80000001
Save it as recycle.reg, then double-click on it, click yes, then okay. This code adds an option to "Folder Options" to hide or "unhide" the recycle bin. To get to Folder Options, just open any file or folder, or My Computer, and click Tools > Folder Options, then, on the view tab, check the option Show Recycle-Bin Icon on the Desktop to hide it, or uncheck it to show it.
Monday, January 4, 2010
Hack your text: how to install your own fonts
Just in case you bought one of those font cd's or downloaded a font, I decided to tell how to install fonts and where to get them.
Eudcedit is not at all advanced compared to the font programs out there, so if you're looking for advanced capabilities, this is not for you.
1. How to install a font
Installing a font is so easy, you'll be rolling on the floor laughing. Well, maybe not.
Just open My Computer, or in Windows 7 and Vista, "Computer", and navigate to C drive, or whatever drive letter your computer is installed on, (usually it's C), and open WINDOWS, and find the folder called "Fonts". Double click on this, and you will get a folder that is not quite normal. All you have to do is drag your new font file into this folder, and a box will pop up saying "Installing font", and should be done quite quickly. What a cinch!!
2. Where to get fonts
Well, getting fonts is quite easy. A font website that I like is www.dafont.com. Of course, there's also a www.fonts.com, which has even more fonts. It claims to have 167,307 fonts! If you don't find the right font, which you probably will, just google "Font websites", and you will get amazing results.
Also, there are TONS of font programs out there that have a lot of fonts packed in. Another something that you should look at are font making programs. Of all the ones I've found, I don't think they're free, but if you create symbol codes, this could be a break-through for you!
NOTE: If you send someone an email with fonts that you downloaded from a website, and they haven't downloaded it, they will not see it the way you see it. Their computer will try to find the closest match to it, which, in the case of very weird fonts, will not look at all like it. So, if you want another person to see it, you can either send the link for the font, or you can attach the file.
If you do not want to get a font program, you might consider Window's built-in "not-as-good-as-the-others" font creator. It doesn't create actual fonts, but let's you create "unicode" characters of your own, that are then stored in a font called all fonts (private characters). To use this editor, click the start button, select Run, and type eudcedit, then press enter. Don't be confused by the scary window, just click the first empty slot, then click okay. Next, paint what you want on the board, then click Edit > Save Character. Then, to use your new character, just click start>Run, and type charmap, then press enter. At the font selector, select all fonts (private characters), then you should see your character. Click select, then click copy, and paste it anywhere you want.
NOTE: You can not send this to someone else's computer, either. It will not be recognized.
NOTE: To create another character, go back to the Private Character Editor, then click Edit > Select Code, and click the next empty slot, then okay, and do the same.
NOTE: For more about the charmap program and what it can do, view the blog post named Unicode Characters.
Also, there are TONS of font programs out there that have a lot of fonts packed in. Another something that you should look at are font making programs. Of all the ones I've found, I don't think they're free, but if you create symbol codes, this could be a break-through for you!
NOTE: If you send someone an email with fonts that you downloaded from a website, and they haven't downloaded it, they will not see it the way you see it. Their computer will try to find the closest match to it, which, in the case of very weird fonts, will not look at all like it. So, if you want another person to see it, you can either send the link for the font, or you can attach the file.
If you do not want to get a font program, you might consider Window's built-in "not-as-good-as-the-others" font creator. It doesn't create actual fonts, but let's you create "unicode" characters of your own, that are then stored in a font called all fonts (private characters). To use this editor, click the start button, select Run, and type eudcedit, then press enter. Don't be confused by the scary window, just click the first empty slot, then click okay. Next, paint what you want on the board, then click Edit > Save Character. Then, to use your new character, just click start>Run, and type charmap, then press enter. At the font selector, select all fonts (private characters), then you should see your character. Click select, then click copy, and paste it anywhere you want.
NOTE: You can not send this to someone else's computer, either. It will not be recognized.
NOTE: To create another character, go back to the Private Character Editor, then click Edit > Select Code, and click the next empty slot, then okay, and do the same.
NOTE: For more about the charmap program and what it can do, view the blog post named Unicode Characters.
Eudcedit is not at all advanced compared to the font programs out there, so if you're looking for advanced capabilities, this is not for you.
Thursday, December 31, 2009
Unicode Character List
To use these, open notepad or word and hold down alt while pressing the numbers on the right-side of the equal sign one at a time on the numpad*. For example, for Ü = 154, you hold alt while you press 1 on the numpad, then 5 on the numpad, then 4 on the numpad. You can also name a file with one or more of these symbols. For example, I named my music file some of the music symbols:


☺ = 1
☻ = 2
♥ = 3
♦ = 4
♣ = 5
♠ = 6
• = 7
◘ = 8
○ = 9
◙ = 10
♂ = 11
♀ = 12
♪ = 13
♫ = 14
☼ = 15
◄ = 17
► = 16
↕ = 18
‼ = 19
¶ = 20
§ = 21
▬ = 22
↨ = 23
↑ = 24
↓ = 25
→ = 26
← = 27
∟ = 28
↔ = 29
▲ = 30
▼ = 31
Characters that are on the keyboard already until:
⌂ = 127
Ç = 128
ü = 129
é = 130
â = 131
ä = 132
à = 133
å = 134
ç = 135
ê = 136
ë = 137
è = 138
ï = 139
î = 140
ì = 141
Ä = 142
Å = 143
É = 144
æ = 145
Æ = 146
ô = 147
ö = 148
ò = 149
û = 150
ù = 151
ÿ = 152
Ö = 153
Ü = 154
¢ = 155
£ = 156
¥ = 157
₧ = 158
ƒ = 159
á = 160
í = 161
ó = 162
ú = 163
ñ = 164
Ñ = 165
ª = 166
º = 167
¿ = 168
⌐ = 169
¬ = 170
½ = 171
¼ = 172
¡ = 173
« = 174
» = 175
░ = 176
▒ = 177
▓ = 178
│ = 179
┤ = 180
╡ = 181
╢ = 182
╖ = 183
╕ = 184
╣ = 185
║ = 186
╗ = 187
╝ = 188
╜ = 189
╛ = 190
┐ = 191
└ = 192
┴ = 193
┬ = 194
├ = 195
─ = 196
┼ = 197
╞ = 198
╟ = 199
╚ = 200
╔ = 201
╩ = 202
╦ = 203
╠ = 204
═ = 205
╬ = 206
╧ = 207
╨ = 208
╤ = 209
╥ = 210
╙ = 211
╘ = 212
╒ = 213
╓ = 214
╫ = 215
╪ = 216
┘ = 217
┌ = 218
█ = 219
▄ = 220
▌ = 221
▐ = 222
▀ = 223
α = 224
ß = 225
Γ = 226
π = 227
Σ = 228
σ = 229
µ = 230
τ = 231
Φ = 232
Θ = 233
Ω = 234
δ = 235
∞ = 236
φ = 237
ε = 238
∩ = 239
≡ = 240
± = 241
≥ = 242
≤ = 243
⌠ = 244
⌡ = 245
÷ = 246
≈ = 247
° = 248
∙ = 249
· = 250
√ = 251
ⁿ = 252
² = 253
■ = 254
= 255
255 is special because it is a blank character, so if you call a file alt + 255, it will be an invisible name.
* It only works when you use the num pad. If you're using a laptop, turn on numlock and do the rest normally.
These unicode characters are really nothing compared to what else is out there. There are WAY MORE than just 255 characters in unicode, and I advise you look at the rest. To see the rest, click Start > Run, then type charmap and press enter. The most populated font I found is Arial Unicode MS, which has thousands of different characters, including chinese, arabic, and other interesting characters.
NOTE: If you want to send an email with unicode characters, watch out, most likely your recipient will not be able to see them the way you see them, just because their email program might not support unicode characters. If they are using Outlook Express, they can click View > Encoding > More > Unicode (UTF-8), and they should see the characters fine. If you find any other solution to this problem, say so!
These unicode characters are really nothing compared to what else is out there. There are WAY MORE than just 255 characters in unicode, and I advise you look at the rest. To see the rest, click Start > Run, then type charmap and press enter. The most populated font I found is Arial Unicode MS, which has thousands of different characters, including chinese, arabic, and other interesting characters.
NOTE: If you want to send an email with unicode characters, watch out, most likely your recipient will not be able to see them the way you see them, just because their email program might not support unicode characters. If they are using Outlook Express, they can click View > Encoding > More > Unicode (UTF-8), and they should see the characters fine. If you find any other solution to this problem, say so!
Tuesday, December 29, 2009
Shutdown prank/hack (Version Two)
This version of the shutdown prank is my own creation, and I really like it, because it'll work more than once. The original version of this hack is a one time prank because you can figure out that Internet Explorer is causing the problem, and never double-click it again. In this version, you make 'em think it's a random error, and they make the mistake again and again before they realize what's happening.
First, click Start>Run, or press Windows Key + R, and type notepad, then press enter. (Notepad can also be found in All Programs>;Accessories>;notepad. And, just in case you're curious, the main location is is C:\WINDOWS\notepad. Type or copy this into notepad with word wrap off:
Set wshshell = wscript.createobject("wscript.shell")
' Create the shell object
wshshell.run "iexplore.exe"
' Run Internet Explorer
wscript.sleep 150000
' Wait for 2 minutes and a half (1000 per minute, feel free to add on time)
wscript.echo "Fatal Error: Windows File System is not compatible with your machine. Error number: 94"
' Create a fake error message to freak them out
wscript.sleep 3000
' Wait for 3 seconds
wshshell.run "shutdown -s -t 01"
' Shutdown the computer in 1 second. The reason I put "-t 01" is because otherwise it would show a popup for 30 seconds announcing that the computer is turning off.
NOTE: Many lines won't work unless you put them on one line. I double spaced all the lines, so any lines that are single spaced need to be placed on the line before it. For Example:
wscript.echo "Fatal Error: Windows File System is not compatible with your machine. Error number: 94"
When you copy the code, click right before "your" and press the backspace key to put it on the same line, and so on for all the lines that are single spaced. Also, the lines that begin with a ' are comments, which are just there to show you what the code does.
You can edit wscript.echo "Fatal Error: Windows File System is not compatible with your machine. Error number: 94" between the quotes to say whatever you want it to say.
When you're done editing it, save it as Internet Explorer.vbs. Now, look on your desktop. There should be an icon called Internet Explorer, that shows a blue scroll. WATCH OUT: If you see .vbs in the name on the desktop, then you need to do an extra step. Go to 1 if you see the extension, and go to 2 if you don't.
1. If you see the extension, then you have an extra step. Open my computer, or any other folder, and click Tools>Folder Options, and on the view tab find the option that says "Hide Extensions for Known file types", and uncheck it if it's checked. If it's not checked, then double-check that the .vbs file you made on the desktop does show the .vbs extension. If it's still there and Hide Extensions for known file types is still checked, then go to the File Types tab in the folder options, and find the option that says VBScript File, not VBScript encoded file. Click on VBScript file and press advanced, and there will be an option saying Always show extension for this kind of file. Uncheck that if it's checked. When you click okay and look at the file on the desktop, it should not show .vbs after Internet Explorer.
2. Now, you need to right-click the file and select Create Shortcut. Select the original file, and right click it and select properties. Check the box that says hidden, and refresh the desktop by right clicking it and selecting refresh. It should disappear. If you have the option that shows hidden files, open my computer, click tools>folder options, click the view tab, and select the options that says do not show hidden files and folders. Now go back to the desktop, and you should not see the original file, and you should see the shortcut. Right-click the shortcut and click change icon. Change it to Internet Explorer, click okay, then click okay again, and it should look exactly like a shortcut to Internet Explorer. When they double click it, it'll run Internet Explorer like normal, but display an error message and shutdown the computer in 2 and a half minutes.
I hope you enjoyed this! Don't be dumb with how you use it, and don't blame me if you get in trouble. Don't use it on your boss and get yourself fired, most importantly.
Home
First, click Start>Run, or press Windows Key + R, and type notepad, then press enter. (Notepad can also be found in All Programs>;Accessories>;notepad. And, just in case you're curious, the main location is is C:\WINDOWS\notepad. Type or copy this into notepad with word wrap off:
Set wshshell = wscript.createobject("wscript.shell")
' Create the shell object
wshshell.run "iexplore.exe"
' Run Internet Explorer
wscript.sleep 150000
' Wait for 2 minutes and a half (1000 per minute, feel free to add on time)
wscript.echo "Fatal Error: Windows File System is not compatible with your machine. Error number: 94"
' Create a fake error message to freak them out
wscript.sleep 3000
' Wait for 3 seconds
wshshell.run "shutdown -s -t 01"
' Shutdown the computer in 1 second. The reason I put "-t 01" is because otherwise it would show a popup for 30 seconds announcing that the computer is turning off.
NOTE: Many lines won't work unless you put them on one line. I double spaced all the lines, so any lines that are single spaced need to be placed on the line before it. For Example:
wscript.echo "Fatal Error: Windows File System is not compatible with your machine. Error number: 94"
When you copy the code, click right before "your" and press the backspace key to put it on the same line, and so on for all the lines that are single spaced. Also, the lines that begin with a ' are comments, which are just there to show you what the code does.
You can edit wscript.echo "Fatal Error: Windows File System is not compatible with your machine. Error number: 94" between the quotes to say whatever you want it to say.
When you're done editing it, save it as Internet Explorer.vbs. Now, look on your desktop. There should be an icon called Internet Explorer, that shows a blue scroll. WATCH OUT: If you see .vbs in the name on the desktop, then you need to do an extra step. Go to 1 if you see the extension, and go to 2 if you don't.
1. If you see the extension, then you have an extra step. Open my computer, or any other folder, and click Tools>Folder Options, and on the view tab find the option that says "Hide Extensions for Known file types", and uncheck it if it's checked. If it's not checked, then double-check that the .vbs file you made on the desktop does show the .vbs extension. If it's still there and Hide Extensions for known file types is still checked, then go to the File Types tab in the folder options, and find the option that says VBScript File, not VBScript encoded file. Click on VBScript file and press advanced, and there will be an option saying Always show extension for this kind of file. Uncheck that if it's checked. When you click okay and look at the file on the desktop, it should not show .vbs after Internet Explorer.
2. Now, you need to right-click the file and select Create Shortcut. Select the original file, and right click it and select properties. Check the box that says hidden, and refresh the desktop by right clicking it and selecting refresh. It should disappear. If you have the option that shows hidden files, open my computer, click tools>folder options, click the view tab, and select the options that says do not show hidden files and folders. Now go back to the desktop, and you should not see the original file, and you should see the shortcut. Right-click the shortcut and click change icon. Change it to Internet Explorer, click okay, then click okay again, and it should look exactly like a shortcut to Internet Explorer. When they double click it, it'll run Internet Explorer like normal, but display an error message and shutdown the computer in 2 and a half minutes.
I hope you enjoyed this! Don't be dumb with how you use it, and don't blame me if you get in trouble. Don't use it on your boss and get yourself fired, most importantly.
Home
Monday, December 28, 2009
Shutdown prank/hack (Version One)
Click this link to download the file: http://sites.google.com/site/computopiahacks/home/files/InternetExplorer.lnk?attredirects=0&d=1
Okay, there are many ways of doing this, but I will show you one way, and hopefully you will be able to make your own uses.
First, right click the desktop and select New>Shortcut. In the box that asks for the location, just type
shutdown -s -t 01
and click next. Name it something like "My biggest secret", or "ALL MY SECRETS, DO NOT TOUCH", or something else that makes people click on it. Click create, then right-click the shortcut that is made. Select properties, then click the Change Icon... Button. Navigate through the icons and find the normal folder icon. Click okay until you're at the desktop again. Your icon should look like a folder named MY BIGGEST SECRET or something like that, and when someone double clicks it, the computer turns off. He he.
Another Idea is to name it Internet Explorer and choose the Internet Explorer Icon! Be creative, use this hack for different things. Maybe find a folder that one of your family members double clicks often, and move it somewhere else, replacing it with a "duplicate", which is the shutdown button.
On the other hand, you can do something useful with it by calling it shutdown instead, and changing the icon to the shutdown icon which is near the end of all those icons. That way, you can easily shutdown your computer.
Okay, there are many ways of doing this, but I will show you one way, and hopefully you will be able to make your own uses.
First, right click the desktop and select New>Shortcut. In the box that asks for the location, just type
shutdown -s -t 01
and click next. Name it something like "My biggest secret", or "ALL MY SECRETS, DO NOT TOUCH", or something else that makes people click on it. Click create, then right-click the shortcut that is made. Select properties, then click the Change Icon... Button. Navigate through the icons and find the normal folder icon. Click okay until you're at the desktop again. Your icon should look like a folder named MY BIGGEST SECRET or something like that, and when someone double clicks it, the computer turns off. He he.
Another Idea is to name it Internet Explorer and choose the Internet Explorer Icon! Be creative, use this hack for different things. Maybe find a folder that one of your family members double clicks often, and move it somewhere else, replacing it with a "duplicate", which is the shutdown button.
On the other hand, you can do something useful with it by calling it shutdown instead, and changing the icon to the shutdown icon which is near the end of all those icons. That way, you can easily shutdown your computer.
Friday, December 25, 2009
Hack your files: two ways to hide a file
You've probably heard of one way to hide a file, but did you know there's actually two ways? The first way is quite simple. Just right-click the file you want to hide, then click properties, then, at the bottom, there's a checkbox labeled "Hidden". Check this to make the file hidden, then click okay, and refresh the desktop by right-clicking it and selecting "Refresh".
The second way, however, is even better. Right-click the file you want to hide, choose rename, then hold alt while pressing 2, then 5, then 5. IMPORTANT: The numbers need to be entered on the num-pad. The file name disappears. Next, right click the icon, click properties, then go to the customize tab. Click the choose icon button, then browse through the icons until you find two empty spots. All you have to do is select one of those and click okay until you're back at the desktop. Your file is hidden, yet you can still access it!
Tip: If you ever lose your file, all you have to do is Ctrl + A, and all the files will be selected. Look for a blank spot that has a blue square. That is your hidden file.
NOTE: If you're using a laptop for this, just turn numlock on and press k, then i, then i again.
You can also name a file some other symbol, like a music symbol. For a complete list of these symbols, look at the post "Unicode Characters".
The second way, however, is even better. Right-click the file you want to hide, choose rename, then hold alt while pressing 2, then 5, then 5. IMPORTANT: The numbers need to be entered on the num-pad. The file name disappears. Next, right click the icon, click properties, then go to the customize tab. Click the choose icon button, then browse through the icons until you find two empty spots. All you have to do is select one of those and click okay until you're back at the desktop. Your file is hidden, yet you can still access it!
Tip: If you ever lose your file, all you have to do is Ctrl + A, and all the files will be selected. Look for a blank spot that has a blue square. That is your hidden file.
NOTE: If you're using a laptop for this, just turn numlock on and press k, then i, then i again.
You can also name a file some other symbol, like a music symbol. For a complete list of these symbols, look at the post "Unicode Characters".
Subscribe to:
Posts (Atom)